情報
環境:Visual Studio2017(Visual Studio2019も確認済み)
言語:C#
OS:widnows10
ダウンロード編
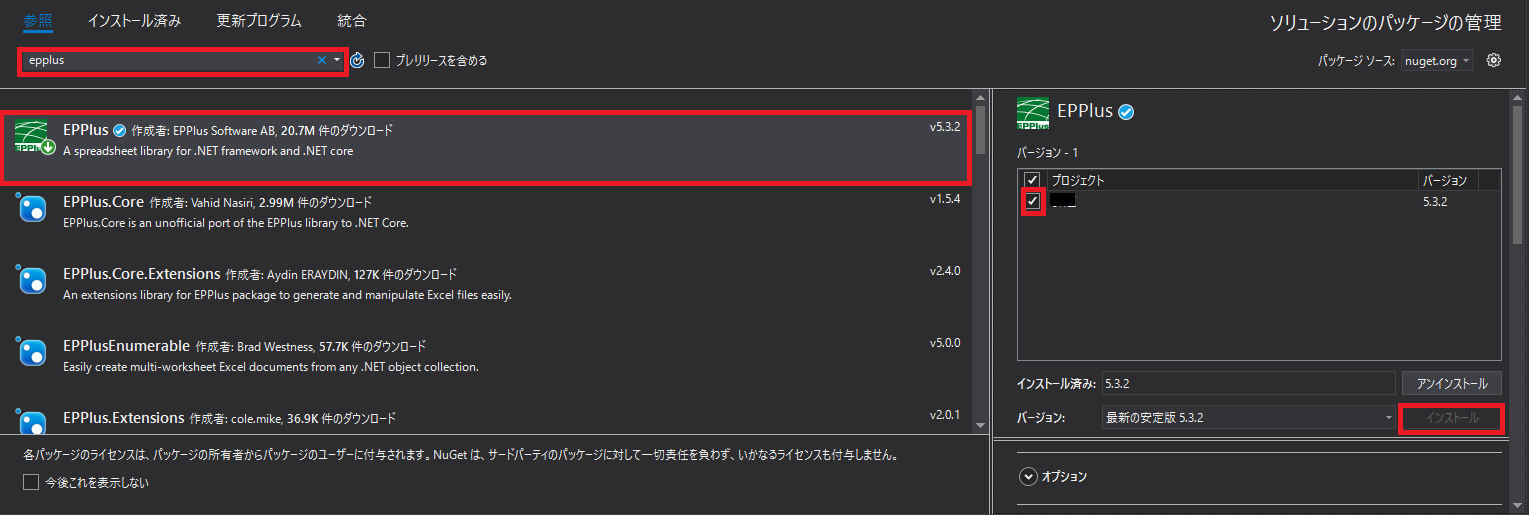
自らネットでダウンロードしてきて参照追加してもよいのですが、
Visual Studioからもダウンロードできるため記録
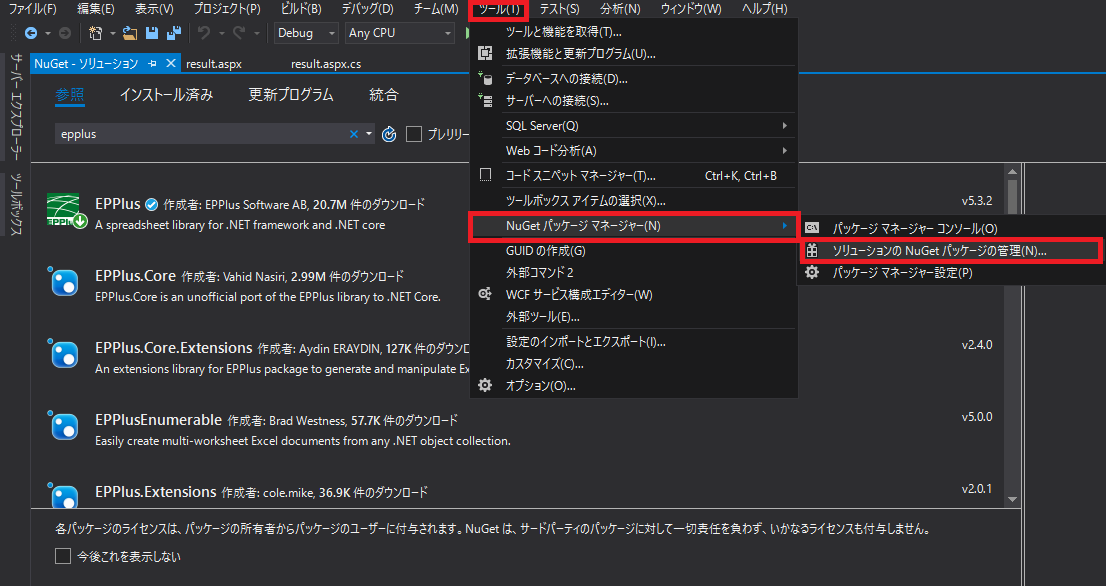
ツール>NuGetパッケージマネージャー>ソリューションのNuGetパッケージの管理
検索にて「EPPlus」を入力後、「EPPlus」を選択すると右側に移動するので、インストールするプログラムにチェックを入れてインストールする

コード編
ライセンス不備?のようなエラーになるので以下のコードはどこかに必須となります
        //以下必須
        // If you are a commercial business and have
        // purchased commercial licenses use the static property
        // LicenseContext of the ExcelPackage class:
        ExcelPackage.LicenseContext = LicenseContext.Commercial;

        // If you use EPPlus in a noncommercial context
        // according to the Polyform Noncommercial license:
        ExcelPackage.LicenseContext = LicenseContext.NonCommercial;
ファイルの用意
        //実ファイルを作成する
        var xlsxFile = File.Create(path);
        //仮想ファイル
        var xlsxFile= new MemoryStream();
Excel編集
        using (var package = new ExcelPackage(xlsxFile))
        {
            // ワークシートを1枚追加
            ExcelWorksheet worksheet = package.Workbook.Worksheets.Add("追加するシート名");
            //A1に値を設定
            worksheet.Cells[1, 1].Value = "hoge";

            //A1:B2に値を範囲設定[開始行, 開始列, 終了行, 終了列]
            worksheet.Cells[1, 1, 2, 2].Value = "hoge";

            //行の高さ設定
            worksheet.Row(3).Height = 3;

            //列の幅設定
            worksheet.Column(3).Width = 4.5;

            //文字の右寄せ
            worksheet.Cells[1, 1].Style.HorizontalAlignment = ExcelHorizontalAlignment.Right;

            //背景色変更↓のおまじないもセットで必要
            worksheet.Cells[1, 1].Style.Fill.PatternType = ExcelFillStyle.Solid;
            worksheet.Cells[1, 1].Style.Fill.BackgroundColor.SetColor(Color.Red);

            //罫線 指定
            worksheet.Cells[1, 1].Style.Border.Top.Style = ExcelBorderStyle.Dotted;
            worksheet.Cells[1, 1].Style.Border.Left.Style = ExcelBorderStyle.Thin;
            worksheet.Cells[1, 1].Style.Border.Right.Style = ExcelBorderStyle.Thin;
            worksheet.Cells[1, 1].Style.Border.Bottom.Style = ExcelBorderStyle.Dotted;

            //枠線
            worksheet.Cells[1, 1].Style.Border.BorderAround(ExcelBorderStyle.Thin);

            //罫線の色指定
            worksheet.Cells[1, 1].Style.Border.Top.Color.SetColor(Color.Red);
            worksheet.Cells[1, 1].Style.Border.Left.Color.SetColor(Color.Red);
            worksheet.Cells[1, 1].Style.Border.Right.Color.SetColor(Color.Red);
            worksheet.Cells[1, 1].Style.Border.Bottom.Color.SetColor(Color.Red);

            // 保存
            package.Save();
            package.Dispose();

       //excelダウンロード
       DownloadFile(stream, "application/msexcel");
        }
ファイルダウンロード
参考元があるのですが、また見つけ次第追記予定
    public void DownloadFile(MemoryStream sFilePath, string sMIME)
    {
        string sDownloadFileName;   // ダウンロードファイル名

        string sFileName = Path.GetFileName(string.Format(@"テーブル定義_{0}.xlsx", "ダウンロードするファイル名"));
        //-----------------------------------------------------------------------------------------
        // 日本語ファイル名を考慮したダウンロードファイル名作成
        //-----------------------------------------------------------------------------------------
        if (Request.Browser.Browser == "IE")
        {
            // IEの場合、ファイル名をURLエンコード
            sDownloadFileName = HttpUtility.UrlEncode(sFileName);
        }
        else
        {
            // IE以外はファイル名は無加工
            sDownloadFileName = sFileName;
        }
        //-----------------------------------------------------------------------------------------
        // ダウンロード処理
        //-----------------------------------------------------------------------------------------
        // Response情報クリア
        Response.ClearContent();
        // バッファリング
        Response.Buffer = true;
        // HTTPヘッダー情報設定
        Response.AddHeader("Content-Disposition", string.Format("attachment;filename={0}", sDownloadFileName));
        Response.ContentType = sMIME;
        // ファイル書込
        //Response.WriteFile(path); //←実ファイルの場合はこっち
        Response.BinaryWrite(sFilePath.ToArray());
        // フラッシュ
        Response.Flush();
        // レスポンス終了
        Response.End();
    }

コメントを残す